
Create a personalisation template
Create a personalisation template
Use templates in Blueprint to build a personalisation flow for products that need customer input, such as custom text, selectable options, or step-by-step choices. From the template, you can control how the personalisation appears on the storefront, which products or collections use it, and whether extra charges are added.
You can open an existing template from Templates to edit it, or create a new one with Create Template.
In the Blueprint app menu, click Templates. From here, either open an existing template or click Create Template to start a new one.
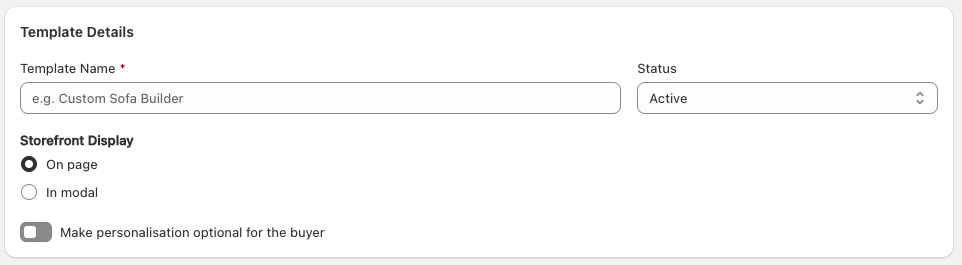
In Template Details, enter a clear Template Name that describes how the template will be used, such as Custom Sofa Builder.
Set the Status for the template:
Active if the template is ready to use
Inactive if you are still building or testing it
Choose a Storefront Display option:
On page shows the personalisation fields directly on the assigned product page
In modal opens the personalisation fields in a pop-up
Use Make personalisation optional for the buyer if customers should be allowed to add the product to cart without completing the template.
You can optionally create a filter group before choosing how options are shown.
Filter groups allow you to present filters to customers that can narrow down option values in complex templates.
For more information about using this feature, see Use filter groups.
Select an options layout from:
Show all options to display every personalisation option in a single section
Show options step-by-step to break the personalisation flow into stages
For more information about the types of product options you can add to a template, see Product option types.
Use Show options step-by-step when the product has several choices or when you want to guide customers through the process in a set order.
After adding your options and steps, assign the template where it should be used.
Click Browse Products to open the product picker, select the products you want, then click Select. You can also click Browse Collections to assign the template to collections instead.
If a template should only apply to specific items, double-check your selected products and collections before saving so it does not appear on the wrong products.
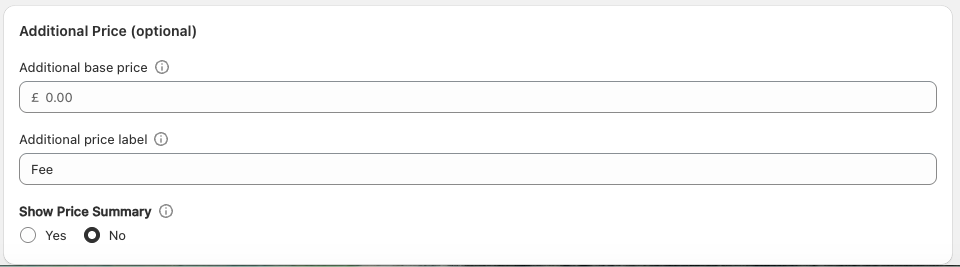
In Additional Price (optional), you can apply an extra charge for the template as a whole.
Use Additional base price when personalisation adds a fixed amount to the product price
Use Additional price label to control the text shown alongside that charge in the basket
Set Show Price Summary to show a breakdown of the product price and additional fees on the product page
If you still need to add or review the product options used in this template, see Product option types.
Save the template and review it on an assigned product to confirm:
the correct template is attached
the chosen Storefront Display behaves as expected
required fields work correctly
any additional pricing appears correctly
the price summary is shown if enabled
Best practices
Use descriptive option names so customers understand what they are choosing
Keep related fields grouped together, especially if using Show all options
Use Title and Dividing Line to make longer templates easier to scan
Set templates to Inactive while building, then switch to Active when ready
Preview pricing carefully if you add charges at both field level and template level
What to check if something looks wrong
Check that the template is set to Active and that it has been assigned to the correct product or collection. Also confirm you selected the intended Storefront Display option.
Review the Make personalisation optional for the buyer setting and the required setting on each option. If personalisation should be mandatory, optional personalisation should be turned off and the relevant fields should be required.
Use Additional price label to give the fee a clear name and enable Show Price Summary so customers can see how the total is made up.